Refactor that ugly code (part 1)
Today I am going to talk about refactoring legacy code. When I say “legacy code” I mean code that has been created by another developer, who isn’t around to explain how the code works. You certainly have seen that kind of code at some point in your career. Code that someone else made, undocumented, messy, hard to read, hard to understand and definitely hard to maintain.
This is the first in a series of posts that will cover the subject of refactoring. In this part I am going to give you some pointers on how to start cleaning up that mess. In the next post I will show you how I would make the code better maintainable and do the actual refactoring.
I have used the racing-car-kata of Emily Bache (Independent Technical Coach and author of "The Coding Dojo Handbook") as a starting point and inspiration to write this post. And as always I will share the GitHub link of my take on this kata at the end of this post.
Imagine this: You have just been hired by the “Red Bull Racing” team as the hotshot developer. They have put you in charge of the Telemetry Monitoring System. You are responsible for monitoring the condition of Max's racing car. They have already developed a service that continuously measures several aspects of the engine, wheels, brakes, etcetera and it gives you instant feedback on the condition of the various components.
Excited as you are, you decide to do a quick git clone of the repository, crank up your favorite IDE and open that project just to take a peek at that awesome piece of code. Then in a matter of just a few minutes your joy and excitement disappears like snow in the sun. No tests. No documentation. Crappy code. Good luck!
TIRE PRESSURE MONITORING SYSTEM
For demonstration purposes the code that I am about to show you is simple, but just imagine that this code is part of a huge code base. The idea is like this. We have two classes:
- TireSensor
- AlarmService
The TireSensor is just a fake sensor because in this exercise the refactoring focus is solely on the AlarmService. Just for the sake of argument pretend that this is an actual implementation of a sensor that communicates over TCP/IP. The sensor measures the pressure of a tire. To simulate a real sensor, every time the measureTirePressure method is called, it returns a random number between 22.5 and 30.5 which represents the actual pressure of the tire.
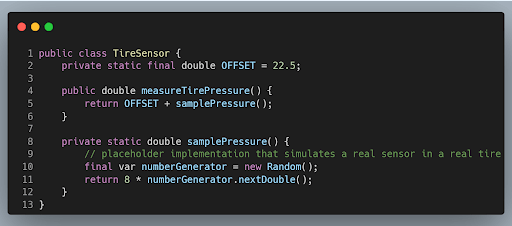
When you take a look at the AlarmService you’ll see that the service measures the pressure of a tire. When the pressure is either too low or too high the alarm is switched on. AlarmStatus is a simple enum which has two values that represent the actual status of the alarm. It can either be ON or OFF.
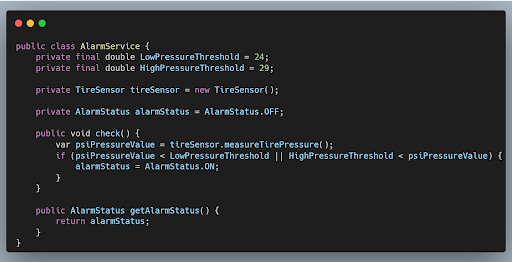
Although the code in this service class is small and the working of the code is fairly straightforward, it contains quite a few code smells and moreover it doesn’t have any unit tests! Time to do something about it.
GETTING STARTED
The first thing you have to do when you start working on the code is resist the urge to start hacking away. No. Seriously. Don't do it! As mentioned earlier the code doesn’t have any unit tests. That is the very first thing you should be focussing on before you even start to think about refactoring! Because as a real boy scout you should not want to change any production code when the code isn’t covered by unit tests. Let’s write the tests and get going!
Quickly you start writing the first test but soon you discover that testing this code is harder than it looks. The main reason that makes it so hard to write the test is because of the call to the measureTirePressure method in the TireSensor class. When writing unit tests most of the time you want to assert some expected output. In this case you want to assert that the alarm is correctly switched on when the pressure is not within a given range.
Given the fact that the method measureTirePressure returns arbitrary/randomized values we can’t assert anything. The result would be a flaky test at best. In order to bring the code under test we have to modify the production code a bit. But, as mentioned earlier, we don’t want to alter any production code if there are no covering tests in place! We’ve got a catch-22 on our hands. This is one of the reasons why some developers don't even bother to start writing unit tests. "Too much hassle". "We'll do it live!". Famous last words!
This time we won't do it live! To circumvent the chicken-or-the-egg problem I tend to bend the rules a little bit. Not breaking, just bending. I still do not change production code. Unless it is to bring the code under test AND the modification can be executed as an automated simple refactoring by the IDE.
BRING THAT CODE UNDER TEST
In general when writing a unit test you want to have absolute control of its collaborators. Control over the collaborators enables you to test your business logic in total isolation. This makes your unit tests fast, repeatable and reliable. You can achieve this by creating a mock of a collaborator, inject it in your class and use the mock instead of the real object. In our case we want to have a mock of the sensor that we can use in our tests, preferably by using a framework like Mockito. In that way you control the behavior of the sensor and make those arbitrary values that the real sensor produces be a thing of the past.
There is only one problem. The sensor is instantiated inside the AlarmService. In other words, there is a hard/direct dependency between the two objects. The AlarmService depends on the concrete implementation of the TireSensor.
Because of the hard dependency we can't mock it directly with Mockito. Well… That's not entirely true. With Mockito (or by using reflection and doing it yourself) we could use field injection in our test which is very easy to use and looks clean.
Very tempting but field injection would not be my preferred choice of injecting because field injection (in comparison to constructor based injection) hides the dependencies that the class needs. You need to dive into the internals of the class itself to see all the dependencies the class needs. Also, a developer could (because it is so easy and clean looking) inject too many dependencies which could lead to the class doing too many things and breaking the single responsibility principle.
To avoid all that and break the hard dependency we can use the "extract and override" technique instead. It would enable us to inject the mock directly into the service and test it that way. How does it work? I will explain this in the next section.
EXTRACT AND OVERRIDE
The goal of the extract and override technique is to separate the business logic that belongs to the class from the calls that are made to the collaborators.

Since the call to the measureTirePressure method is the call that we want to have control over in our tests we are going to make a seam. A seam in software development is a place where two classes interact with each other. An often used analogy is a seam in clothing, being the line where two pieces of fabric are stitched together.
For years the IDE of my choice has been IntelliJ. With IntelliJ we can easily extract a method in an automated fashion. It's just a matter of selecting the method, pressing Ctrl + Alt + M, making sure that the method is protected and there you go! We have created our seam.
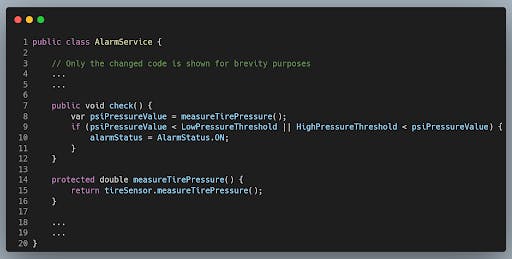
You might think: what does extracting that code into a separate method bring us? Good question! Absolute control over the sensor.
In our test code (AlarmServiceTest) we can now create an inner class (TestableAlarmService) that extends the AlarmService and overrides the logic in the seam. We are now able to make the sensor return any value that we want, when we want! Finally! We can start doing some real unit testing now.
I want to keep the TestableAlarmService as lean and mean as possible. The reason for keeping it simple is that the need for the "extract and override" technique is a sure sign of a very big code smell in your production code. The TestableAlarmService is just a temporary solution. At the end of this whole refactor exercise I want this TestableAlarmService madness expelled from my code base and peace will then be restored in my project. But for now, we go with this solution to break the hard dependency that the service has on the sensor.
In my TestableAlarmService I am overriding all the seams of the actual AlarmService that contain the code that I want to mock. Only thing left to do is injecting the mock in the subclass. And by doing this the mock has been separated from the actual business logic that I want to test.
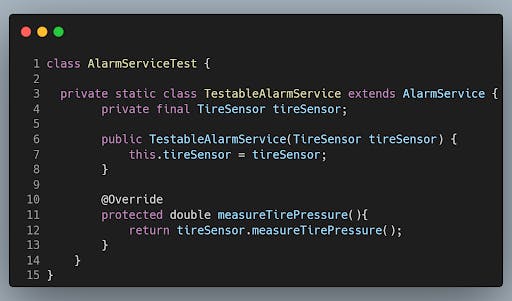
TestableAlarmService is ready. Now it's time to start covering all the business logic in the AlarmService and add those tests. Analyzing the AlarmService I come up with 5 different scenarios, they are:
- Alarm should be off when the service has been initialized.
- Alarm should be off when the pressure is optimal
- Alarm should be activated when pressure is too low
- Alarm should be activated when pressure is too high
- Once the alarm is activated it should stay activated regardless of the pressure values measured after that
In the first scenario there is no interaction with the sensor, so therefore we can instantiate the AlarmService and assert that the alarm is off. In the other scenarios there is interaction between the service and the collaborator. This is where our TestableAlarmService comes into play. We can instantiate and use the TestableAlarmService and assert the alarm status as you would normally do.
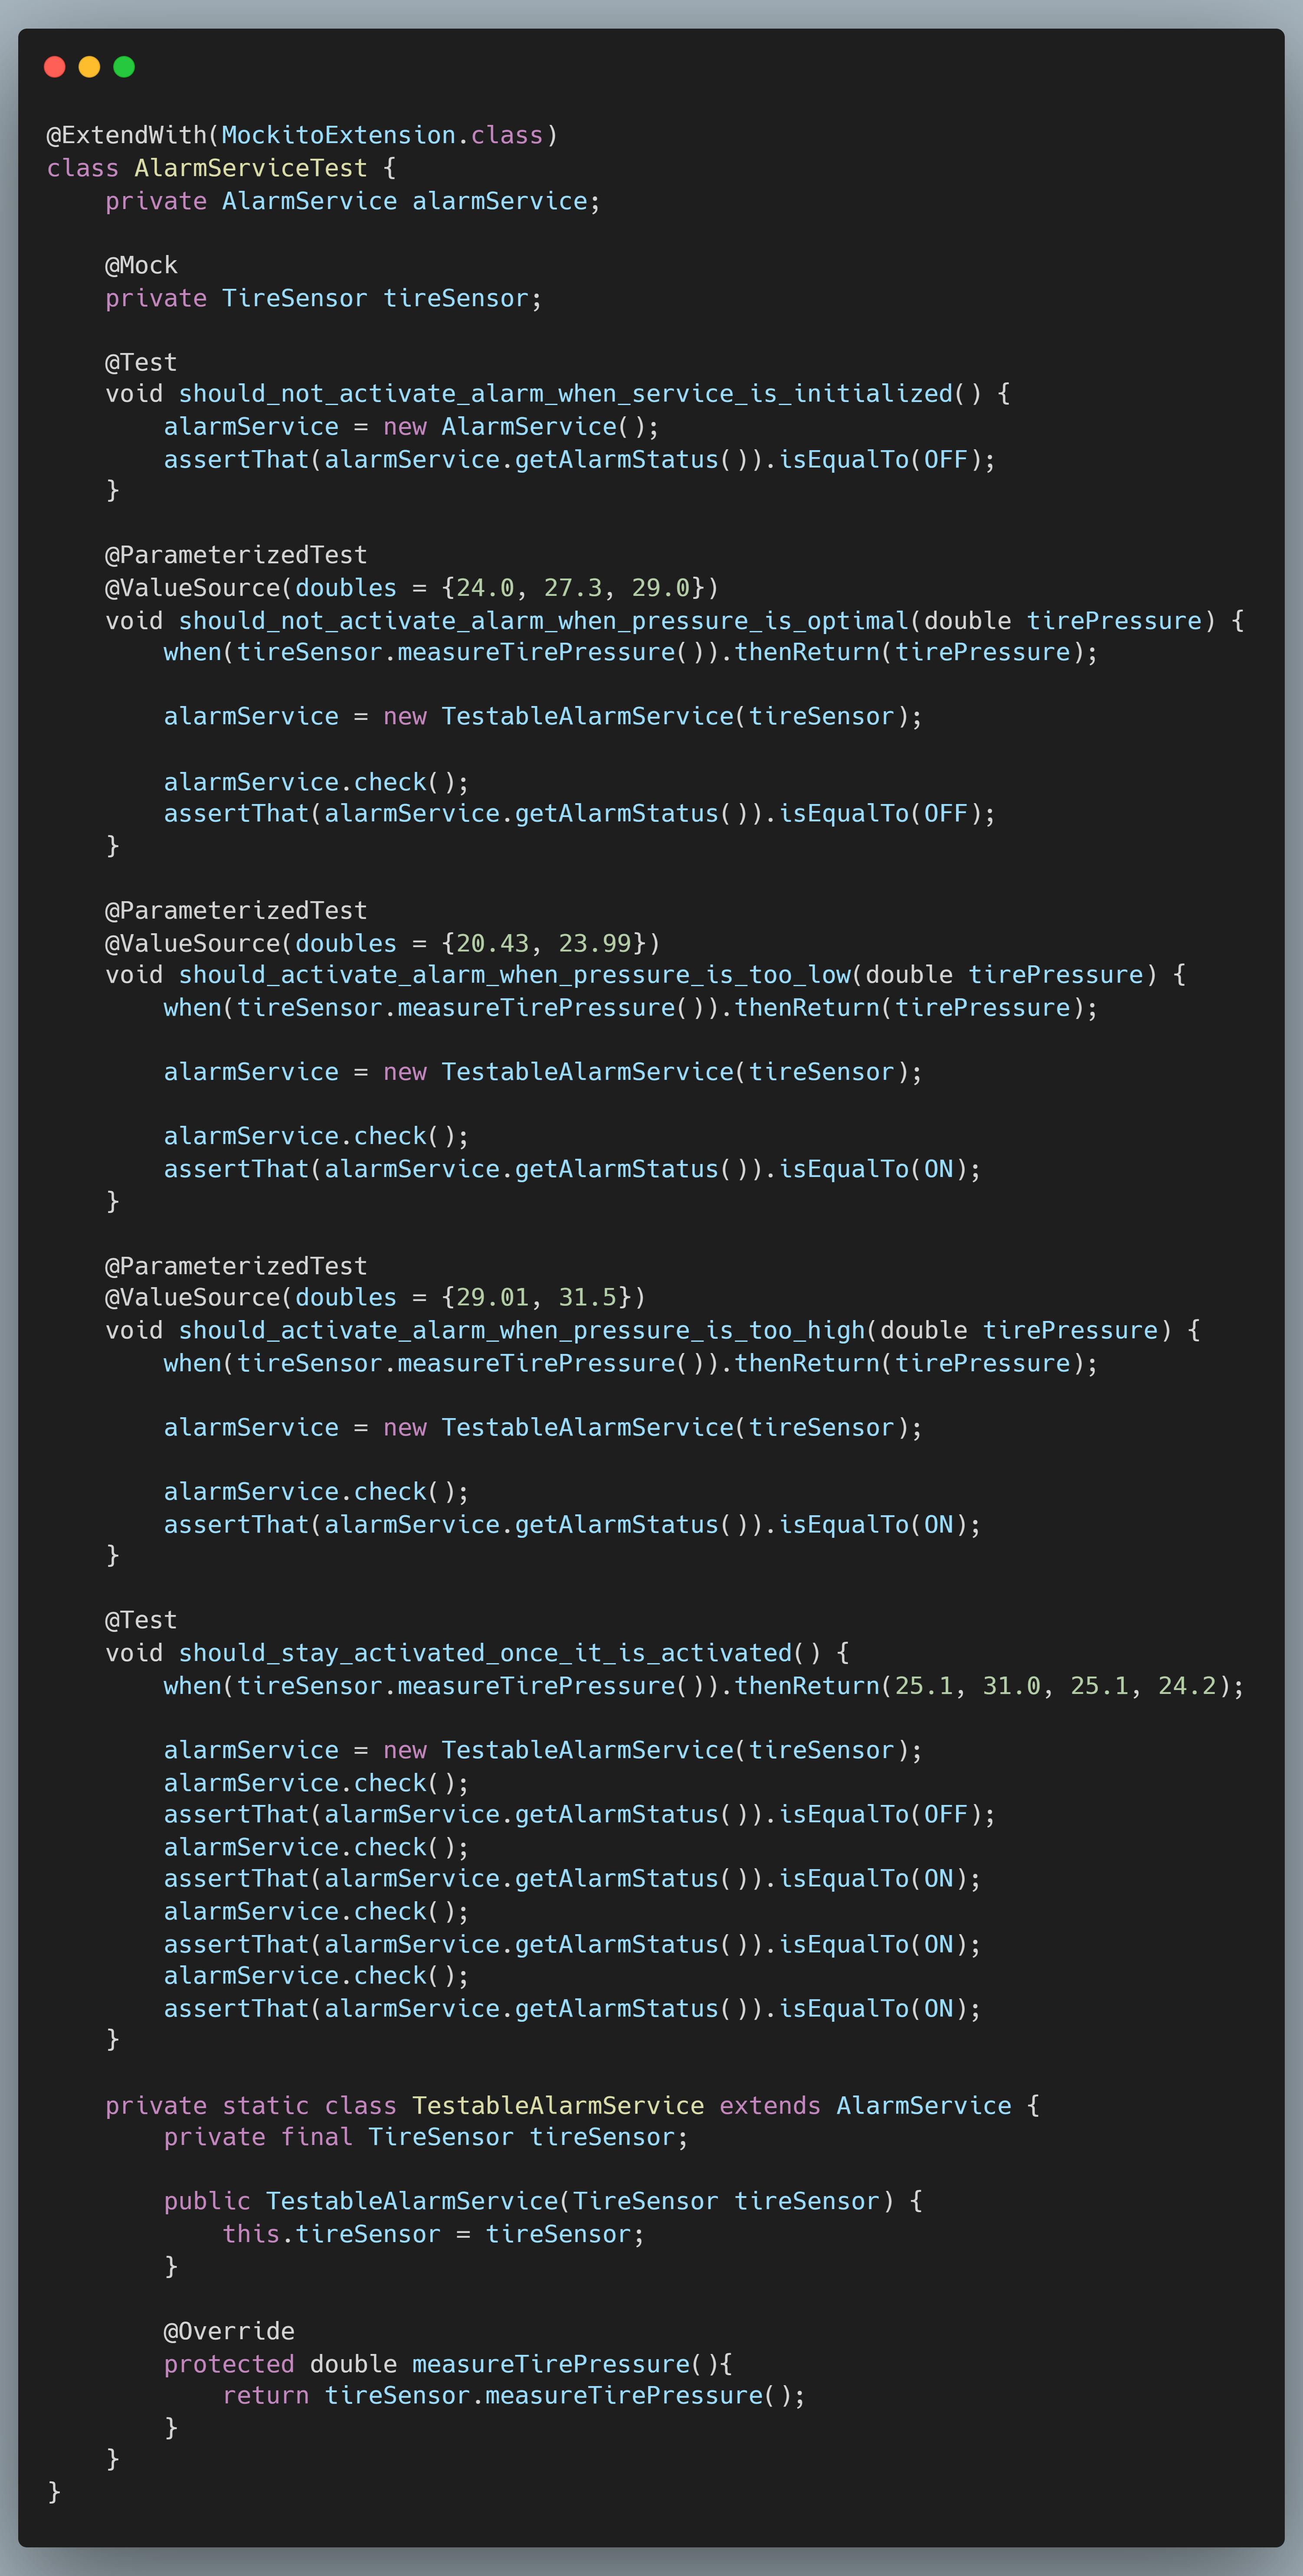
You probably noticed that I am using @ParameterizedTest in my test class. Parameterized tests enable me to run a certain scenario (test case) multiple times and provide different values for the pressure I want the sensor to return. Handy for testing obvious values and edge cases without having to write the same test twice.
The @ParameterizedTest annotation is available in JUnit 5. I hope not, but if you are still using JUnit 4 you'll have to use a third-party library to enable parameterized tests. JUnitParams is a good example of such a library.
Tests are done. Life is good. Time to check if my AlarmService is fully covered by the tests. I run the tests with code coverage statistics on and, as you can see in the next screenshot, all the business logic is covered. Everything except for the seam, but that is expected. Keep in mind that the seam will be a temporary thing. The main point that I want to bring across is that all the business logic which we are interested in has been covered by tests.
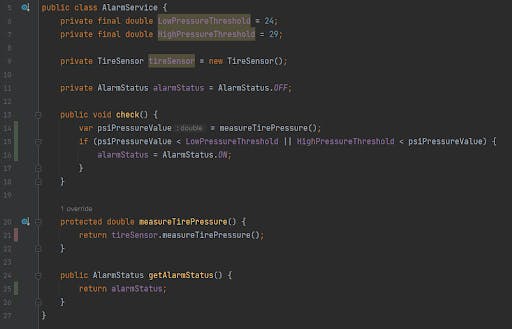
Alright! Not bad at all. We are done for the day. Halfway there. A lot of work has been done already:
- We discovered that it isn't always easy to bring existing code under test because of hard dependencies.
- We resisted the temptation of using field injection in our tests.
- We have seen that hard dependencies can be broken with the extract and override technique.
- We noticed that once these dependencies are broken it is really easy to test our business logic.
Looking at the code it is far from what we ultimately want but it is much better than what it was when we began. We are in pretty good shape to finally start refactoring.
In my next post I will cover the actual refactoring of the service and we will finally be freed from those horrible code smells.
The code is available on my GitHub. The starting position can be found here:
https://github.com/vlouisa/tire-pressure-kata/tree/tpms-service
The result of bringing the code under test can be found here:
https://github.com/vlouisa/tire-pressure-kata/tree/tmps-service-under-test